Contact Us
  Home /
 how to calibrate a 3d printer


Quality, reliable and accurate prints start with a well-calibrated 3D printer. The mechanical parts, extrusion system, or print parameters in the printer must be set correctly in order for the most sophisticated printer to print well. Learning how to calibrate your FDM printer can help you gain much better consistency in your prints, minimize failed attempts and save materials whether you use them for prototypes, functional prints or creative projects.
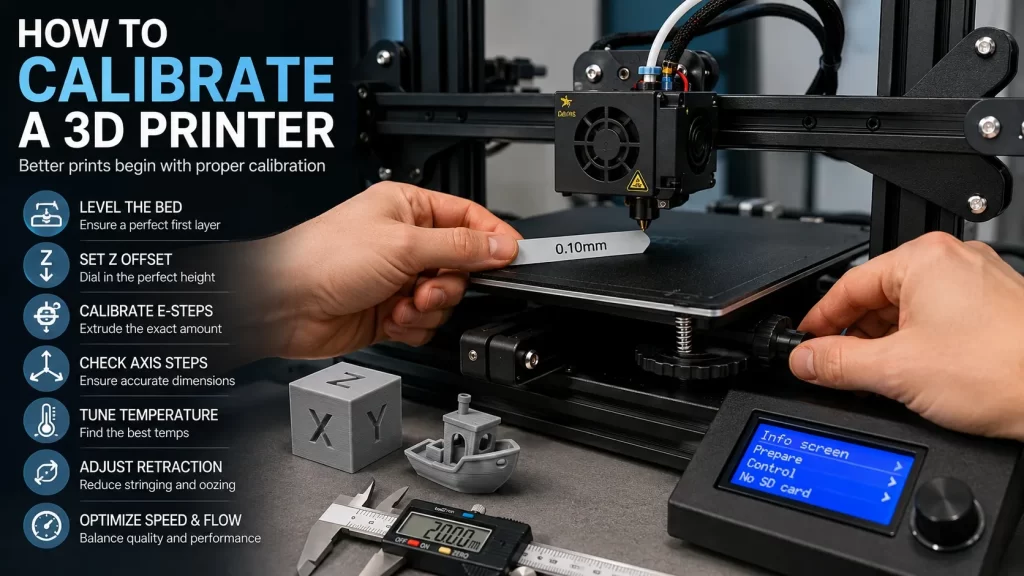
This guide illustrates the reasons why calibration is important, when to calibrate your printer, and how to get professional results.
What Is 3D Printer Calibration?
Calibration is the process of getting your 3D printer to print parts that are consistent with your digital design by adjusting its mechanical, electrical, and/or software parameters.
Proper calibration ensures:
- Accurate dimensions
- Smooth surface finish
- Strong layer adhesion
- Reliable first layers
- Consistent extrusion
- Reduced print failures
Calibration is a process that is not done just one time. Components wear, belts loosen and nozzles get clogged as the printers age. Regular maintenance helps maintain peak performance.
Why Calibration Is Important
A lot of common print problems are not hardware related, but are calibration problems.
If not calibrated properly, you can be subject to:
- Warped prints
- Poor bed adhesion
- Stringing
- Under-extrusion
- Over-extrusion
- Layer shifting
- Dimensional inaccuracies
- Rough surfaces
- Weak mechanical strength
A properly calibrated printer delivers:
- Higher print success rates
- Better dimensional accuracy
- Faster troubleshooting
- Less filament waste
- Longer machine lifespan
When Should You Calibrate Your 3D Printer?
Routine calibration is recommended whenever:
- You assemble a new printer
- You replace the nozzle
- You install a new extruder
- You upgrade firmware
- You move the printer to another location
- You switch filament types
- You notice declining print quality
- Prints begin failing unexpectedly
Even experienced users typically perform quick calibration checks before important print jobs.
Step 1: Inspect the Printer
Before adjusting software settings, inspect the hardware carefully.
Check the following:
- Tighten loose frame bolts
- Ensure belts have proper tension
- Verify pulleys are secure
- Inspect wheels and linear rails
- Clean lead screws
- Remove dust from cooling fans
- Confirm smooth axis movement
Mechanical problems cannot be fixed through slicer settings alone.
Step 2: Level the Print Bed
Bed leveling is one of the most important calibration steps.
If the nozzle sits too close to the build plate:
- Filament cannot extrude properly.
- The nozzle may scratch the bed.
If the nozzle is too far away:
- Poor first-layer adhesion occurs.
- Prints may detach during printing.
For manual leveling:
- Heat the nozzle and bed to normal printing temperature.
- Home the printer.
- Move the nozzle to each corner.
- Use a sheet of paper between the nozzle and bed.
- Adjust leveling knobs until slight resistance is felt.
- Repeat until all corners are consistent.
Many modern printers include automatic bed leveling systems that generate a compensation mesh, but even these systems often require proper Z-offset adjustment.
Step 3: Adjust the Z Offset
The Z offset controls the exact distance between the nozzle and the print surface after homing.
A properly adjusted first layer should appear:
- Slightly flattened
- Continuous
- Smooth
- Evenly bonded
If the first layer looks rounded or easily peels away, lower the nozzle slightly.
If the filament appears excessively squashed or transparent, raise the nozzle a little.
A perfect first layer often determines the success of the entire print.
Step 4: Calibrate Extruder E-Steps
Extruder calibration ensures the printer pushes the correct amount of filament.
A common procedure includes:
- Heat the hotend.
- Mark 120 mm of filament above the extruder.
- Command the printer to extrude 100 mm.
- Measure the remaining filament.
- Calculate new E-step values if necessary.
- Save the updated settings.
Proper extrusion calibration improves:
- Dimensional accuracy
- Wall thickness
- Surface quality
- Layer bonding
Incorrect extrusion often causes over-extrusion or under-extrusion problems.
Step 5: Verify X, Y, and Z Axis Accuracy
Even when extrusion is accurate, axis movement must also be precise.
Print a calibration cube—typically a 20 × 20 × 20 mm model.
Measure each dimension using digital calipers.
If measurements differ significantly from the design:
- Inspect belt tension
- Verify pulley tightness
- Confirm stepper motor calibration
- Adjust axis steps if required
Accurate axis movement is especially important for engineering parts requiring tight tolerances.
Step 6: Optimize Printing Temperature
Different filaments require different temperature settings.
Typical starting ranges include:
| Material | Nozzle Temperature | Bed Temperature |
|---|---|---|
| PLA | 190–220°C | 50–60°C |
| PETG | 220–250°C | 70–90°C |
| ABS | 230–260°C | 90–110°C |
| TPU | 210–240°C | 40–60°C |
Printing temperature influences:
- Layer adhesion
- Surface finish
- Stringing
- Strength
- Bridging performance
Many users print a temperature tower to identify the ideal settings for each filament brand.
Step 7: Tune Flow Rate
Flow rate, sometimes called the extrusion multiplier, fine-tunes how much plastic exits the nozzle.
Signs of excessive flow:
- Bulging walls
- Elephant's foot
- Rough surfaces
- Dimensional errors
Signs of insufficient flow:
- Visible gaps
- Weak walls
- Poor layer adhesion
Small adjustments of 1–3% often produce significant improvements.
Step 8: Calibrate Retraction
Retraction minimizes stringing by pulling filament back during travel moves.
Retraction settings depend on:
- Direct-drive extruders
- Bowden systems
- Filament type
- Printing temperature
Common symptoms of incorrect retraction include:
- Fine strings
- Oozing
- Surface blobs
Printing a dedicated retraction test can help identify the optimal distance and speed.
Step 9: Fine-Tune Print Speed
Printing too quickly often reduces quality.
Higher speeds may cause:
- Ringing
- Layer shifting
- Poor adhesion
- Reduced dimensional accuracy
Lower speeds generally improve:
- Detail
- Surface finish
- Consistency
For most desktop FDM printers:
- Outer walls: 30–50 mm/s
- General printing: 40–70 mm/s
- First layer: 15–30 mm/s
Step 10: Print Calibration Models
After completing calibration, verify performance using test prints.
Popular calibration models include:
- Calibration cube
- Benchy boat
- XYZ cube
- Temperature tower
- Retraction tower
- Overhang test
- Bridging test
These models reveal remaining issues before printing larger or more expensive parts.
Common Calibration Problems
| Problem | Likely Cause | Solution |
|---|---|---|
| Poor first layer | Incorrect bed leveling | Re-level the bed |
| Stringing | Retraction or temperature | Tune retraction settings |
| Under-extrusion | Incorrect E-steps | Recalibrate extruder |
| Layer shifting | Loose belts | Tighten belts |
| Dimensional errors | Axis calibration | Verify X/Y/Z movement |
| Warping | Bed temperature | Increase bed heat and improve adhesion |
Maintenance Tips for Long-Term Accuracy
To keep your printer calibrated:
- Clean the nozzle regularly.
- Lubricate lead screws.
- Tighten frame hardware monthly.
- Replace worn nozzles.
- Check belt tension periodically.
- Store filament in dry conditions.
- Recalibrate after major hardware upgrades.
Regular maintenance decreases print failures, and increases the printer's lifespan.
Final Thoughts
As a maker, engineer or manufacturing professional, learning how to calibrate your 3D printer could be one of your greatest investments. Calibration enhances print quality, dimensional accuracy, consistency, material usage, and reduces the failure rate and troubleshooting.
With the regular monitoring of bed level, Z offset, extrusion accuracy, axis movement, temperature, flow rate and retraction settings, your printer can consistently create professional quality parts with a variety of materials and applications. From prototyping to manufacturing parts to creating production-ready models, a properly calibrated 3D printer will always turn out the same results.
Talk to the Manufacturer, Not a Middleman
Resources & Insights
-
 Hide blog post
CNC Machining Robotic Parts: How GD&T Controls Robot Assembly Accuracy
2026-09-24By KT Engineering -
 Hide blog post
Hardware Stamping Springback Control for High-Strength Steel Parts
2026-09-24By KT Engineering -
 Hide blog post
Spring Stamping Fatigue Life: How Geometry, Material and Edge Quality Affect Cycle Life
2026-09-24By KT Engineering -
 Hide blog post
Mechanical Automation Parts for Robot End Effectors and Positioning Accuracy
2026-09-23By KT Engineering