Contact Us
  Home /
 how to use a 3d printer


Table of Contents
- What Do You Need Before Using a 3D Printer?
- Step 1: Choose or Create a 3D Model
- Step 2: Slice the Model
- Step 3: Select the Right Material
- Step 4: Prepare Your 3D Printer
- Step 5: Transfer the Print File
- Step 6: Start Printing
- Step 7: Monitor the Printing Process
- Step 8: Remove the Finished Print
- Step 9: Post-Process the Model
- Common Beginner Mistakes
- Tips for Better 3D Printing Results
- Frequently Asked Questions
- Final Thoughts

3D printing has revolutionized the product design, prototyping and production processes for many people. From building custom models to creating functional prototypes, or businesses manufacturing end-use parts, mastering 3D printing is a crucial ability.
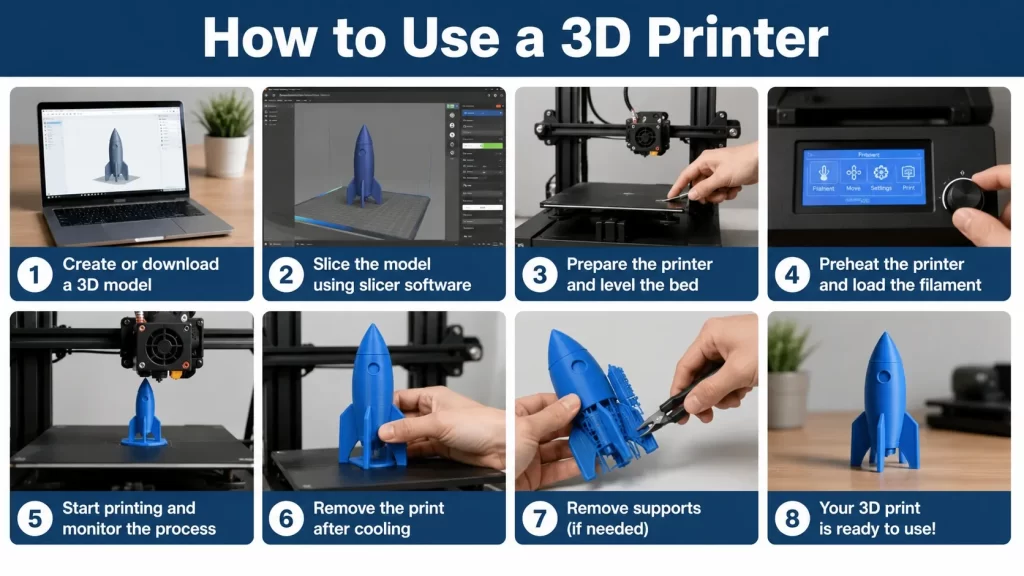
Current desktop-sized 3D printers are simpler to use than ever before. Ease of use makes it possible for any user to create professional quality prints in hours, even without an expert touch, and the intuitive slicing software, automatic bed leveling, and smart calibration features contribute to this. This guide covers all aspects of your workflow with 3D printing, from design to object printing and even finishing, while providing helpful hints to ensure your 3D prints are always the same. The overall process described here is similar to a lot of FDM/FFF printers in the industry.
What Do You Need Before Using a 3D Printer?
Before starting your first print, make sure you have the following essentials:
- A reliable 3D printer
- Filament material (PLA, PETG, ABS, TPU, etc.)
- A computer with slicing software
- A 3D model (STL, OBJ, or 3MF file)
- Basic maintenance tools such as a scraper, cutters, and cleaning brush
Many of the printers they have for beginners have all of the necessary tools except for filament.
Step 1: Choose or Create a 3D Model
All 3D prints start with a digital model.
There are three methods of getting one:
Download Ready-Made Models
There are several websites out there that offer thousands of free printable models for the novice, such as Printables, Thingiverse, and MakerWorld.
Design Your Own
CAD programs like Fusion 360, SolidWorks, Tinkercad or FreeCAD can be used to design parts.
Scan Existing Objects
The 3D scanner can easily scan real products to create digital models, which can be duplicated or altered.
Before printing, check that there are no holes or overlapping surfaces or errors in the geometry of your model.
Step 2: Slice the Model
STL files are not understandable by a 3D printer.
Instead, the model has to be converted to machine instructions through slicing software.
Popular slicers include:
- Cura
- OrcaSlicer
- PrusaSlicer
- Bambu Studio
The slicer is used to divide the model into a series of very thin layers and to create G code for the printer, which tells the printer how to move.
When slicing, you'll go through the following important settings:
- Layer height
- Wall thickness
- Infill percentage
- Print speed
- Nozzle temperature
- Bed temperature
- Support structures
- Build plate adhesion
For beginners, default profiles usually produce excellent results.
Step 3: Select the Right Material
Choosing the correct filament greatly affects print quality and durability.
PLA
The easiest material to print.
Ideal for:
- Educational projects
- Decorative models
- Prototypes
- Home use
Advantages:
- Low warping
- Excellent surface finish
- Beginner-friendly
PETG
Offers improved strength and chemical resistance.
Suitable for:
- Mechanical parts
- Outdoor applications
- Functional prototypes
ABS
Known for its durability and heat resistance.
Common uses include:
- Automotive components
- Industrial fixtures
- Engineering parts
ABS typically requires an enclosed printer because it can warp during printing.
TPU
A flexible material used for:
- Phone cases
- Seals
- Gaskets
- Wearable products
Each material requires different print temperatures and cooling settings.
Step 4: Prepare Your 3D Printer
One of the most crucial phases is the setup of the printer.
Before each print, make sure to check:
Load the Filament
Load filament into the extruder and preheat the nozzle to the recommended temp for the material.
Level the Build Plate
The first layer needs to be well leveled if the bed leveling is correct.
A large number of contemporary printers have:
- Automatic bed leveling
- Mesh calibration
- Automatic Z-offset adjustment
Older printers may require manual leveling.
Clean the Build Surface
Dust, grease, and fingerprints reduce adhesion.
Use isopropyl alcohol to clean the build plate before printing.
Check the Nozzle
Ensure the nozzle is clean and free from previous filament residue.
Step 5: Transfer the Print File
After slicing, export the G-code file.
Depending on your printer, you can transfer it using:
- SD card
- USB drive
- USB cable
- Wi-Fi
- Ethernet
- Cloud printing platform
Wireless printing has become increasingly popular because it allows remote monitoring and print management.
Step 6: Start Printing
Once the file is loaded:
- Select the print job.
- Confirm temperatures.
- Begin printing.
Watch the first few layers carefully.
The first layer determines whether the entire print succeeds.
Signs of a good first layer include:
- Smooth extrusion
- Even line spacing
- Strong adhesion
- No curling or lifting
If the first layer fails, stop the print and adjust the bed level or nozzle height before trying again.
Step 7: Monitor the Printing Process
Although many printers operate unattended, periodic monitoring is recommended.
Watch for problems such as:
- Layer shifting
- Filament tangles
- Nozzle clogging
- Warping
- Support failures
Some printers include built-in cameras and mobile apps that allow remote monitoring.
Print time depends on:
- Object size
- Layer height
- Print speed
- Infill density
Small models may finish in under an hour, while large functional parts can require more than 24 hours.
Step 8: Remove the Finished Print
Let the build plate cool down before taking the object off.
Many materials can be helped to naturally release from the print surface by cooling the material.
When scraping is necessary, use a plastic scraper not metal tools to prevent damage to the build plate.
Do not use force to remove a print from the plate while the plate is still hot.
Step 9: Post-Process the Model
Many prints require light finishing.
Common post-processing techniques include:
- Removing support structures
- Trimming excess material
- Sanding rough surfaces
- Priming and painting
- Polishing
- Gluing multiple parts together
Professional-looking models often result from careful post-processing rather than printing alone.
Common Beginner Mistakes
Most printing problems are easy to solve.
Poor Bed Adhesion
Causes:
- Dirty build plate
- Incorrect nozzle height
- Low bed temperature
Solution:
Clean the plate and recalibrate the first layer.
Stringing
Occurs when melted filament leaks during travel moves.
Solution:
Adjust retraction settings and lower nozzle temperature.
Warping
Usually affects ABS and large flat parts.
Solution:
Use an enclosure and improve bed adhesion.
Under-Extrusion
Common causes include clogged nozzles or incorrect extrusion calibration.
Regular maintenance helps prevent this issue.
Tips for Better 3D Printing Results
Improve print quality by following these best practices:
- Keep filament dry using sealed storage containers.
- Update printer firmware regularly.
- Use manufacturer-tested print profiles.
- Perform routine nozzle cleaning.
- Lubricate moving components when recommended.
- Replace worn nozzles periodically.
- Calibrate the printer after hardware changes.
Consistent maintenance leads to more reliable prints and fewer failures.
Frequently Asked Questions
Is 3D Printing Difficult for Beginners?
Not anymore. Whereas the earlier printers were difficult to use, today's printers are much more user friendly and have automatic calibration, intuitive software and preset material profiles.
What Is the Best Filament for Beginners?
The PLA is the more beginner's friendly filament because of its low printing temperature, less warping and its high printing quality.
How Long Does a 3D Print Take?
Print time is subject to variation due to size, layer height and print settings of the object. Simple parts can be completed in hours, more complicated parts in a full day or more.
Can I Leave a 3D Printer Running Overnight?
While it is advised that many experienced users do, it is recommended to ensure the printer is well-maintained, on a stable, fire safe surface and monitored remotely if possible.
Final Thoughts
Improvements in 3D printer hardware, software and automation make it easier than ever to learn how to use the machines. After the fundamental workflow (from creating or downloading a model, slicing it, preparing the printer, printing and post processing), you can manufacture anything from something small in the home to engineering prototypes to production ready parts.
These are key steps to help you get better results from your 3D printer, decrease failures, and maximize your investment for your education, product development, manufacturing, or personal projects.
Talk to the Manufacturer, Not a Middleman
Resources & Insights
-
 Hide blog post
CNC Machining Robotic Parts: How GD&T Controls Robot Assembly Accuracy
2026-09-24By KT Engineering -
 Hide blog post
Hardware Stamping Springback Control for High-Strength Steel Parts
2026-09-24By KT Engineering -
 Hide blog post
Spring Stamping Fatigue Life: How Geometry, Material and Edge Quality Affect Cycle Life
2026-09-24By KT Engineering -
 Hide blog post
Mechanical Automation Parts for Robot End Effectors and Positioning Accuracy
2026-09-23By KT Engineering