Contact Us
  Home /
 How to Use Metal Stamps


Table of Contents
- What Is Metal Stamping?
- Essential Tools You'll Need
- Step 1: Prepare Your Workspace
- Step 2: Practice Before Your Final Project
- Step 3: Plan Your Layout
- Step 4: Position the Stamp Correctly
- Step 5: Strike with Confidence
- Step 6: Inspect Your Impression
- How to Make Stamped Designs Stand Out
- Common Metal Stamping Mistakes
- Best Metals for Beginners
- Caring for Your Metal Stamps
- Creative Project Ideas
- Frequently Asked Questions
- Final Thoughts

Metal stamping is one of the most satisfying and straightforward processes of creating permanent marking on metal surface. From creating personalized jewelry to engraving ID tags, creating custom gifts, or branding handmade items, mastering the use of metal stamps can make a world of difference in the quality of your work.
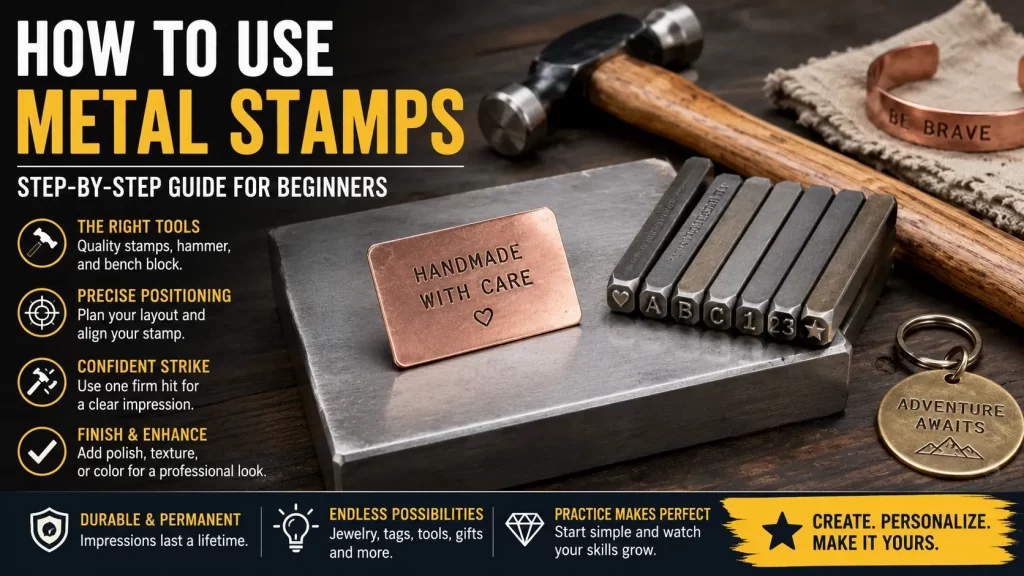
This complete guide covers selecting the proper tools, stamping techniques, avoiding common mistakes and keeping the equipment in top condition for years of trouble-free use.
What Is Metal Stamping?
Hand metal stamping uses hardened steel stamps and hammer to make permanent impressions of letters, numbers, symbols or logos into metal, by hand. Stamping affects the metal in a different way from engraving, which takes material away.Stamping is more durable than engraving, as it displaces the metal so it will not fade or peel over time.
This technique is used all over the world:
- Jewelry making
- Custom keychains and dog tags
- Industrial part identification
- Metal crafts
- Knife and tool branding
- Personalized gifts
- Product serial numbering
As stamped impressions are permanent, they are great for projects that need to be long lasting and can be used for identification or decoration.
Essential Tools You'll Need
Before you begin, gather the following equipment.
Metal Stamps
Choose quality hardened steel stamps. Beginners usually start with:
- Alphabet stamps
- Number stamps
- Design stamps
- Logo stamps
Higher-quality stamps produce cleaner impressions and last significantly longer.
Stamping Hammer
A brass, steel, or specialized metal stamping hammer delivers consistent force without damaging the stamp.
Steel Bench Block
A hardened steel block provides a solid surface that absorbs impact and creates crisp impressions.
Metal Blanks
Practice first on soft metals such as:
- Aluminum
- Copper
- Brass
Once you're confident, you can move to harder materials like stainless steel.
Masking Tape or Stamp Guide
Keeping the blank from moving is one of the easiest ways to improve stamping accuracy.
Safety Equipment
Always wear safety glasses while striking metal tools.
Step 1: Prepare Your Workspace
It is essential to have a stable workbench.
Position the steel bench block on a heavy, solid table. Be careful not to use soft or flexible surfaces as they absorb the impact energy and produce shallow or indistinct impressions.
For protection of your table, if needed, set a wooden board under the steel block.
Light is also important for making sure that you stamp your items properly.
Step 2: Practice Before Your Final Project
Professional stamp makers test their stamp before they start working with it.
Learn how to use inexpensive aluminum practice blanks:
- How hard to strike
- Proper stamp positioning
- Letter spacing
- Alignment
Every metal reacts differently.
For example:
- Aluminum requires relatively light force.
- Brass needs moderate impact.
- Stainless steel generally requires stronger blows or specialized stamps.
Practice until your impressions become consistent.
Step 3: Plan Your Layout
One of the biggest beginner mistakes is stamping without planning.
Before striking:
- Mark the center point.
- Sketch your layout using a pencil or removable marker.
- Use alignment guides if available.
- Measure spacing carefully.
For words to be stamped, start in the center and work outwards to balance positioning.
Some extra minutes of planning can save you a lot of money.
Step 4: Position the Stamp Correctly
Make sure to keep the stamp vertical all the time.
The stamp should be perpendicular to the metal surface.
If it tilts:
- One side may stamp deeper.
- The design can appear incomplete.
- Double impressions become more likely.
Hold the stamp securely in the non-dominant hand, make sure that your fingers are not in the striking area.
Step 5: Strike with Confidence
A common beginner mistake is tapping too lightly.
Instead:
- Deliver one clean, confident hammer strike.
- Avoid multiple weak hits.
- Keep the stamp completely still during impact.
If the impression isn't deep enough, repositioning for another strike is extremely difficult and often creates a shadow image.
Consistent, controlled force produces the cleanest results.
Step 6: Inspect Your Impression
After stamping:
- Check depth
- Verify alignment
- Remove any debris
- Lightly polish the surface if needed
Don't worry if your first few attempts aren't perfect.
Metal stamping is a skill that improves rapidly with practice.
How to Make Stamped Designs Stand Out
Professional-looking projects often include additional finishing techniques.
Darken the Letters
Fill stamped impressions with:
- Enamel paint
- Paint markers
- Permanent markers
After filling the grooves, wipe away excess color from the surface.
The remaining paint highlights the design and improves readability.
Polish the Surface
Use polishing cloths or fine abrasives to remove scratches while preserving the stamped impression.
This gives jewelry and decorative pieces a professional finish.
Add Texture
Texture hammers can create:
- Dimple patterns
- Crosshatch finishes
- Decorative backgrounds
- Matte surfaces
Adding texture makes personalized pieces even more unique.
Curve Flat Pieces
Using dapping tools, flat blanks can be shaped into:
- Bracelets
- Rings
- Curved pendants
- Decorative tags
The stamped design remains intact during proper shaping.
Common Metal Stamping Mistakes
Avoid these errors for cleaner results.
Striking Too Softly
Weak impacts often produce incomplete impressions.
Hitting Multiple Times
Unless the stamp never moved, repeated strikes usually create blurred images.
Poor Alignment
Always measure before stamping.
Working on Soft Surfaces
Soft work surfaces absorb energy and reduce impression quality.
Skipping Practice
Even experienced professionals test new materials before starting customer projects.
Best Metals for Beginners
If you're new to metal stamping, start with softer metals.
| Metal | Difficulty | Recommended |
|---|---|---|
| Aluminum | Easy | Excellent |
| Copper | Easy | Excellent |
| Brass | Medium | Good |
| Sterling Silver | Medium | Good |
| Stainless Steel | Difficult | Advanced |
Beginning with softer metals helps build confidence while minimizing mistakes.
Caring for Your Metal Stamps
Quality metal stamps can last decades with proper maintenance.
Follow these simple tips:
- Keep stamps clean after each use.
- Store them in a dry location.
- Prevent rust with light protective oil if necessary.
- Never strike hardened stamps with damaged hammers.
- Organize stamp sets to avoid chipped edges.
Proper care ensures consistent impressions every time.
Creative Project Ideas
Once you've mastered the basics, try creating:
- Personalized necklaces
- Initial bracelets
- Pet ID tags
- Custom keychains
- Wedding favors
- Holiday ornaments
- Handmade business branding
- Tool identification tags
- Camping gear labels
- Custom gifts
Metal stamping combines creativity with functionality, making it a favorite hobby for makers and small businesses alike.
Frequently Asked Questions
Can I stamp stainless steel?
Yes, but stainless steel is much harder than aluminum or brass. You'll need hardened stamps and greater striking force.
What hammer works best?
A special metal stamping hammer gives greater control and helps to cut down on tool wear, compared to common household hammers.
Why are my impressions uneven?
The most common causes include:
- Tilting the stamp
- Insufficient force
- Working on an unstable surface
Should I hit the stamp more than once?
Ideally, no. Cleanest impression is made with one firm strike. Double images are caused by multiple hits.
Final Thoughts
What seems like a difficult task to many beginners is actually quite easy to learn how to use metal stamps. Using the proper tools, a level work surface and practice you can make crisp, permanent impressions for use in jewelry, crafts, industrial marking, and personalized gifts.
Use soft metals, work on alignment and get used to one confident strike. As you get better, you'll be able to work with more complex materials and more detailed projects and create professional-quality work.
Whether you are a talented hobbyist or a small business owner, learning how to do metal stamping can be a skillful and creative tool that can be used in a variety of different ways.
Talk to the Manufacturer, Not a Middleman
Resources & Insights
-
 Hide blog post
CNC Aluminum Components: How Surface Finish Affects Anodizing Quality
2026-08-18By KT Engineering -
 Hide blog post
Stamping Supplier in China: Dongguan Precision Tooling and Metal Stamping Guide
2026-08-18By KT Engineering -
 Hide blog post
Cabinet Cover Components: Lightweight, Modular and Smart Enclosure Design Guide
2026-08-17By KT Engineering -
 Hide blog post
Connector Mold Components for Automotive High-Voltage Connectors
2026-08-16By KT Engineering